


These Lemon Poppy Seed Scones will delight all your senses. The texture is soft when they come out of the oven and has a bit of a tangy effect from the lemon zest.
The glaze on top provides added sweetness but still contains a citrusy character. The poppy seeds add a beautiful visual and crunchy texture to these flavorful little biscuits. Enjoy your scones with a cup of Earl Grey Tea.
These lemon scones will be a new favorite in your life. You can serve them for brunch with these Lemon Pancakes for a complete lemon experience.

Jump to:
What You Will Love About This Recipe
Lemon Poppy Seed Scones are a delightful treat that I love for several reasons. First, the tangy and refreshing flavor of lemon adds a burst of brightness to the scone, making it a perfect choice for a morning or afternoon indulgence. The light crunch and nuttiness from the poppy seeds provide a delightful texture that complements the soft, crumbly interior of the scone. I know you will love these scones as much as I do.
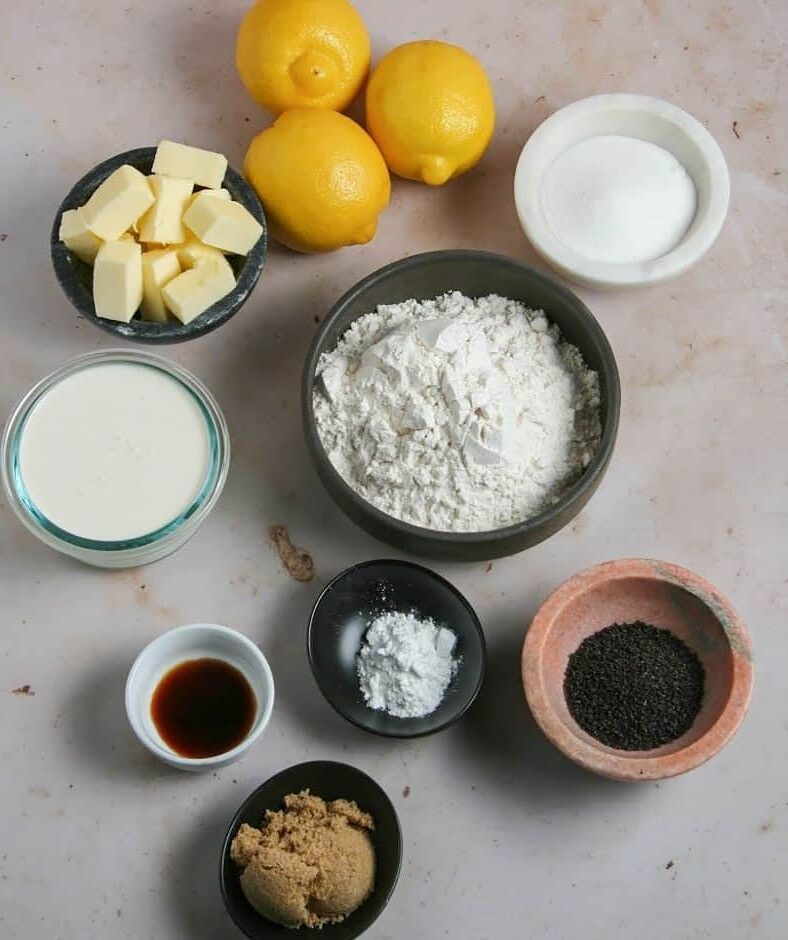
Ingredients
- Lemons: Use ripe lemons for fresh juice and zest after washing.
- Poppy Seeds Are found in the spice aisle.
- Brown Sugar: Use light brown sugar and make sure it’s fresh.
- Granulated Sugar: Use your pantry granulated sugar.
- Chilled Butter: Make sure to use unsalted butter. Also, keep it chilled until just before slicing or grating.
- All-Purpose Flour
- Vanilla Extract: Good quality or homemade will be best.
- Salt
- Powdered Sugar Confectioners’ sugar will make the best glaze.
Lemon Poppyseed Scones Instructions:
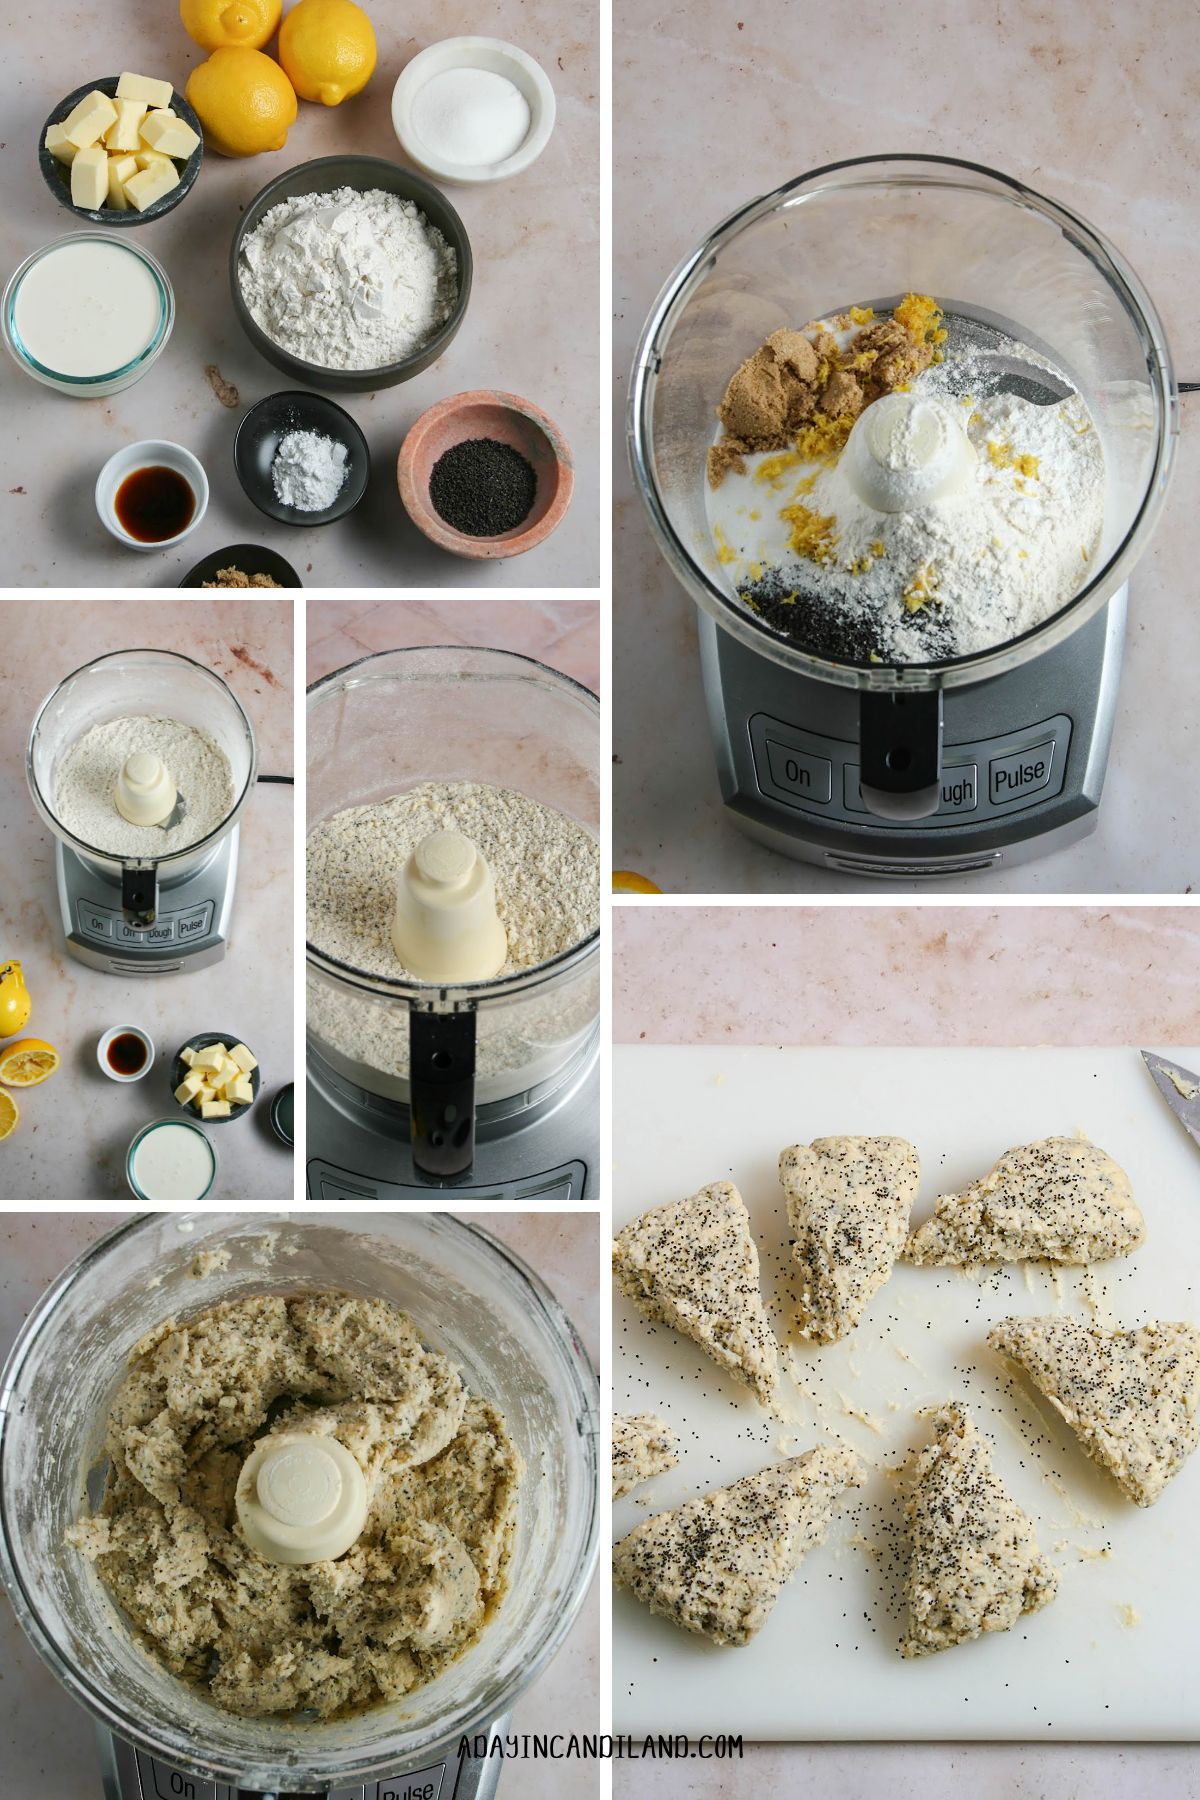
- Add the flour, baking powder, lemon zest, brown and granulated sugars, salt, and poppy seeds into a food processor.
- Cut the chilled butter into cubes and add it to the same bowl along with the heavy cream, lemon juice, and vanilla extract. Use the pulse option of your food processor until a shaggy dough forms. You want a dough that is well mixed, yet still lumpy from the cold butter. Make sure the flour is incorporated.
- Form the dough into one ball and transfer it from the food processor into a bowl. Refrigerate for 30 minutes to make sure the butter is cold before baking. Preheat the oven to 325 degrees.
You won’t need to add any topping or jam, but if you prefer, you can scoop up a dollop of lemon curd and add it to your plate. A nice cup of Earl Grey with a hint of bergamot or Lavender herbal tea will be a nice accompaniment to your scones.
How to Prepare the Poppy Seed Scones
Imagine baking these luscious scones for a small get-together or adding them to a birthday tea basket. Inviting some friends over, sharing a pot of your favorite tea, maybe some tea sandwiches, and enjoying great conversation.
There is nothing better than bonding over freshly baked food and drink. These lemon scones can be made in advance and frozen until needed, or make a few batches before your guests arrive. If you prefer to bake scones without eggs, this is a winner.
You can even make them without the glaze if you are in a hurry or don’t want the added sugar. They will still be just as scrumptious. For more baking scone tips, read here.
History of Scones
Scones have a rich history rooted in the culinary traditions of the British Isles. Originating in Scotland, early scones were flat oatcakes cooked on griddles. Over time, they transformed into lighter pastries with the addition of baking powder. Scones gained popularity throughout England, Ireland, and Wales, becoming a beloved treat often enjoyed warm with clotted cream and jam during afternoon tea.
As the British Empire expanded, scones spread globally, adapting to regional flavors and ingredients. Today, scones come in a variety of flavors and are cherished worldwide for their delicious taste and association with British culture.
These treats, often served warm with cream and jam, have become synonymous with afternoon tea and hold a special place in British culinary traditions.
Expert Tips & Notes
- If you would like to make these scones ahead of time or bake a fresh scone every morning, you can freeze the dough for up to 3 weeks. To do this, simply cut the dough into triangles and line them up on a baking tray so they are not touching. Place them in the freezer like this for 2 hours. Once they are frozen and are not at risk of sticking together, transfer them to a freezer bag or Tupperware container. When you are ready to bake, simply defrost completely, or add 3 extra minutes to the baking time.
- You can also freeze baked scones for up to 2 months. When you are ready to eat, simply stick them in the oven at 350 degrees Fahrenheit and bake for 6-8 minutes until they are warm.
- Keep the butter and heavy cream as cold as possible to ensure that the scones rise and become fluffy.
- If using a food processor, only use the pulse function to ensure that you do not over-mix your dough.
- A food processor will help you mix the dough using less heavy cream than mixing it by hand. This will result in a fluffier and lighter scone. If you do not have a food processor, you may need to add a few extra tablespoons of heavy cream to get the dough fully incorporated. Add this one tablespoon at a time.
- I would not recommend substituting the heavy cream for a less fatty substitute, such as regular or skim milk. The scones will spread too much.
Scones FAQs
You can freeze these scones for up to 2 months. Place in individual sealed baggies or containers. When you are ready to eat, simply stick it in the oven at 350 degrees Fahrenheit and bake for 6-8 minutes. You can also freeze before baking, by taking the individual triangles and sealing them in a baggy for up to 3 weeks. Add 3 extra minutes for baking time.
Use unsalted butter and make sure it is chilled. This is what makes the scones fluffy and airy.
If you form it into a disk and then cut it into 8 slices, you have the perfect scones. If you want, you can buy a scone pan to get them the same size.
Poppy seeds perform several functions in baked goods, such as providing a rich, nutty flavor that may be intensified by toasting. They provide a mild nutty aroma. Also, they contribute a crunchy texture. Just make sure you have a toothpick on hand, and they like to stay between your teeth.

Try These Other Lemon Recipes
If you loved this recipe and made it, please give it a ⭐⭐⭐⭐⭐ review! Leave a comment about your experience on the recipe comment section. That will help get more eyes on it. You can also pin it to Pinterest or share it on Facebook.
Lemon Poppyseed Scones Recipe

Lemon Poppyseed Scones
Ingredients
- 2 Cups All Purpose Flour
- 2 Teaspoons Baking Powder
- 2/3 Cup Heavy Cream
- 1/2 Stick Unsalted Butter
- 2 Tablespoons Lemon Juice Fresh Squeezed is best
- 2 Tablespoons Lemon Zest
- 1/4 Cup Granulated Sugar
- 2 Tablespoons Light Brown Sugar
- 2 Tablespoons Poppyseeds
- 1/2 Teaspoon Salt
Glaze
- 1/2 Cup Powdered Sugar
- 1 Tablespoon Heavy Cream
- 1 Teaspoon Heavy Cream 1 TBS plus 1 TS Heavy Cream
- 1 Tablespoon Lemon Juice
Instructions
- Add the flour, baking powder, lemon zest, both sugars, salt, and poppy seeds to the bowl of a food processor. Pulse until combined (If not using a Food Processor refer to notes)
- Cut the butter into cubes and add it into the same bowl along with the heavy cream, lemon juice, and vanilla extract. Use the pulse option of your food processor until a shaggy dough forms. You want a dough that is well mixed, yet still lumpy from the cold butter. Make sure the flour is completely incorporated.
- Form the dough into one ball and transfer it from the food processor into a bowl. Refrigerate for 30 minutes to make sure the butter is cold before baking.
- While the dough chills, preheat the oven to 350 degrees fahrenheit, and prepare a baking tray lined with parchment paper.
- Once the dough ball has chilled, press it down into a thick disk and cut into 6-8 triangles, depending on how large you would like your scones.
- Bake the scones for 22-25 minutes or until the bottoms are golden brown. The scones will be soft right when you take them out but will become more firm as they cool.
- Let the scones cool for 20 minutes before glazing to ensure that the glaze doesn’t melt right off. While the scones rest, make the glaze. In a small bowl, combine the powdered sugar, heavy cream, and lemon juice. Use more heavy cream for a thinner glaze, and less if you want it thicker. Option of adding extra lemon zest or poppy seeds.
- Drizzle the glaze over the scones. Then let them rest for a few minutes to let the glaze harden. Then serve and enjoy!
Notes
- If you would like to make these scones ahead of time or bake a fresh scone every morning, you can freeze the dough for up to 3 weeks. To do this, simply cut the dough into triangles and line them up on a baking tray so they are not touching. Place them in the freezer like this for 2 hours. Once they are frozen and are not at risk of sticking together, transfer them to a freezer bag or Tupperware container. When you are ready to bake, simply defrost completely, or add 3 extra minutes to the baking time.
- You can also freeze baked scones for up to 2 months. When you are ready to eat, simply stick them in the oven at 350 degrees Fahrenheit and bake for 6-8 minutes until they are warm.
- Keep the butter and heavy cream as cold as possible to ensure that the scones rise and become fluffy.
- If using a food processor, only use the pulse function to ensure that you do not over-mix your dough.
- A food processor will help you mix the dough using less heavy cream than mixing it by hand. This will result in a fluffier and lighter scone. If you do not have a food processor, you may need to add a few extra tablespoons of heavy cream to get the dough fully incorporated. Add this one tablespoon at a time.
- I would not recommend substituting the heavy cream for a less fatty substitute such as regular or skim milk. The scones will spread too much.